Automation and integration tools: link up your data and automate routine tasks
There are a host of new user friendly, drag and drop automation and integration tools on the market aimed at helping people link up their applications to reduce inconsistency & duplication and to automate routine tasks. Aimed at a non-technical audience they are designed to give you control over your data and the systems you use, rather than leaving it in the hands of developers.
Why do we need Integration tools?
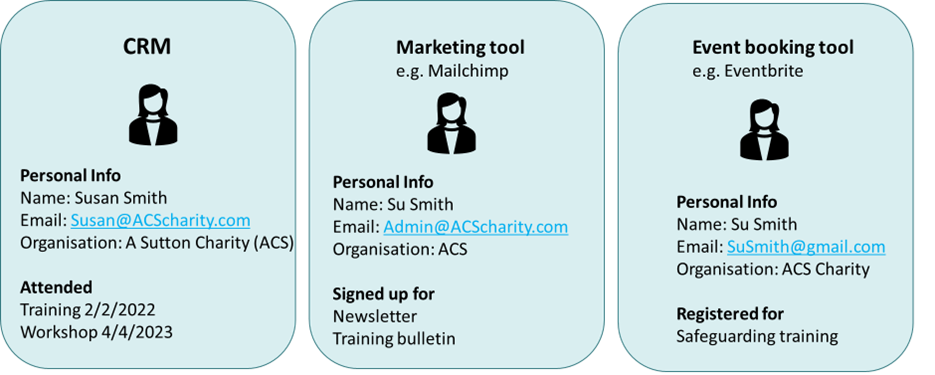
Pretty much all of us are now using more than one online tool to manage our data – databases, survey tools, newsletter & mailing packages, websites, web forms, data visualisation tools – and although the benefits are huge there is one big downside: duplication & inconsistency. Data gets spread around all these different tools and the usual result is a bit of a muddle with the same people’s data popping up in our case management database, our email marketing tool, our survey tool and then to make matters worse you realise that the data isn’t even the same in these different places.
Here's an example:
What you really want is one Susan with all the things she’s attended, signed up for and registered for in one place with one set of contact information. And you only want her, or your staff, to enter her once in one place not 3 times in 3 places.
Luckily, we’re not the first people to identify this issue so there are a host of tools out there to help pass data from one application to another using rules to decide what goes where and when. And, the good news is that you don’t need to be a developer to use these tools, they all have intuitive, easy to use interfaces which makes then accessible to everyone.
The biggest challenge is to work out the logic behind the process you want to automate: which should be your primary source, which database should update which? Which direction should the data flow in? Is the flow always the same or do different factors change it?
How does an integration workflow work?
Integrations have 3 basic steps (which might be repeated if it’s a complicated flow):
-
Step 1: Choose a source & a destination
-
Step 2: Set up a trigger
-
Step 3: Define an action
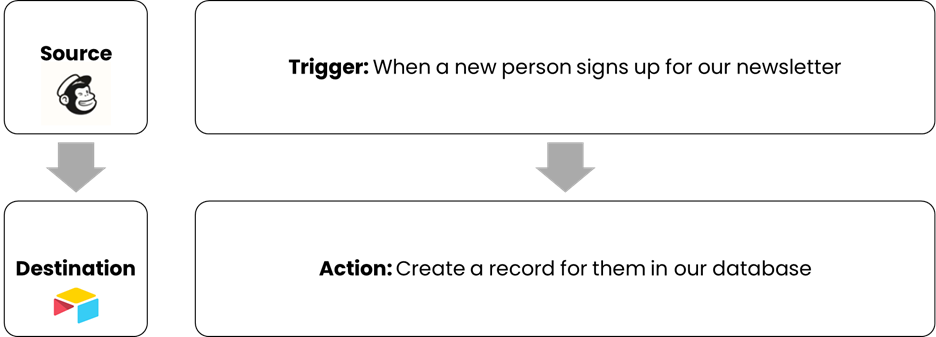
Here’s an example of basic integration to give you a sense of what we’re talking about:
In this scenario, an organisation is using Mailchimp for their newsletter, they have a form on their website where people can sign up to it but also have a database where they manage all their client information and their interactions with them. This means that when someone signs up to their newsletter, they have to manually add them to their database.
To automate this process we need Mailchimp to be the source and Airtable, which they use as their database, to be the destination. In other words, when something is added in Mailchimp (a Trigger) we want it to be automatically added to Airtable (an Action)
This is already a huge step forward from manually updating our database from Mailchimp but inevitably, integrations aren’t always simple. Sending data from one application to another requires careful planning and rules about what should be sent, where, when and how.
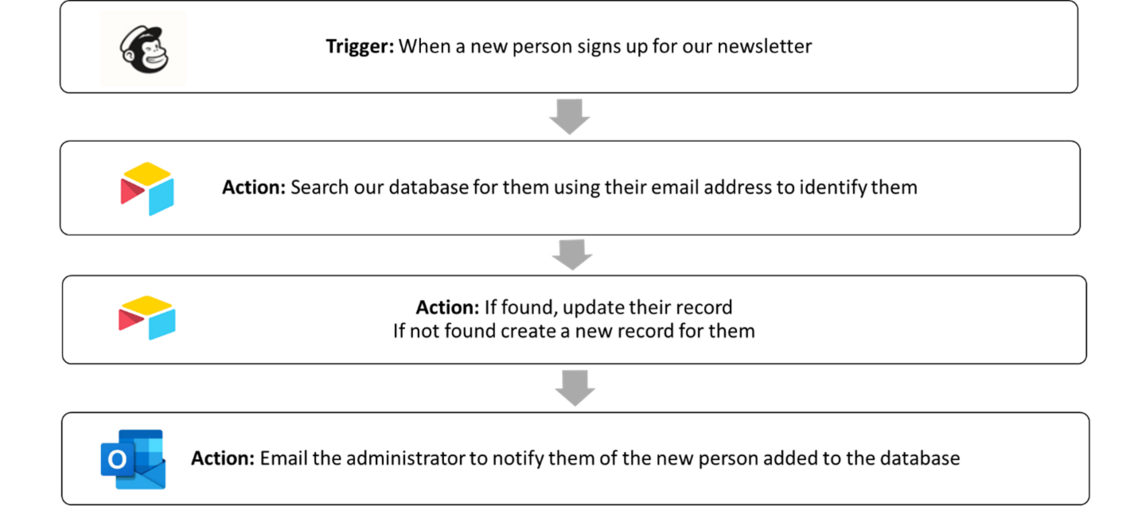
For example with the above scenario questions start to bubble up almost immediately:
- What happens if the person is already in the Airtable database?
- How could you match them up? Name? Email address?
- How can you ensure you don’t create duplicate records?
- How will you know a new record has been created in the database?
Here’s an example of how a multi-step integration can help tackle those questions and automate your process:
Getting all of your data into one place is just one example of how to use some of these incredibly powerful new automated integration tools but the possibilities are even wider.
You can automate pretty much anything you can apply rules to, anything which doesn’t require human intervention to make a judgement call. For example, when someone completes a Google form to join a class then they are automatically added to the Excel class list and emailed a confirmation via Outlook.
How to set up an automated integration
There are a number of different options to help you set up automated process such as the ones above:
Free or low cost standalone integration & automation tools
These tools allow you to build your own integrations using an easy to use drag and drop interface. There are several on the market all of which work in a similar way, we’re not going to cover them all but instead have picked two big market leaders which we like using: Zapier and Make (formerly called Integromat).
The massive plus of these standalone tools is the range of applications they support, for example Zapier has more than 5,000 applications and Make more than 1,200. Although 5,000 sounds better, they both support all the most common tools such as:
- Google – Sheets, Forms, Mail, Calendar etc
- Microsoft – Excel, Forms, Outlook, Teams, SharePoint, Power BI etc
- Survey & Form tools – Survey Monkey, Jotform, Typeform
- Mailing tools – Mailchimp
- Event booking tools - Eventbrite etc
- Databases – Salesforce, Knack, Airtable
And if you can’t find the application you want you can still link any application with an Application Programming Interface or API. So, for example, if you are using a charity CRM and can’t find it in the list of applications supported, then contact your CRM provider to ask if they have an API. If the answer is yes, then you should be able to use either Zapier or Make to link them together.
Zapier
A brilliant entry level tool, very clear and easy to use.
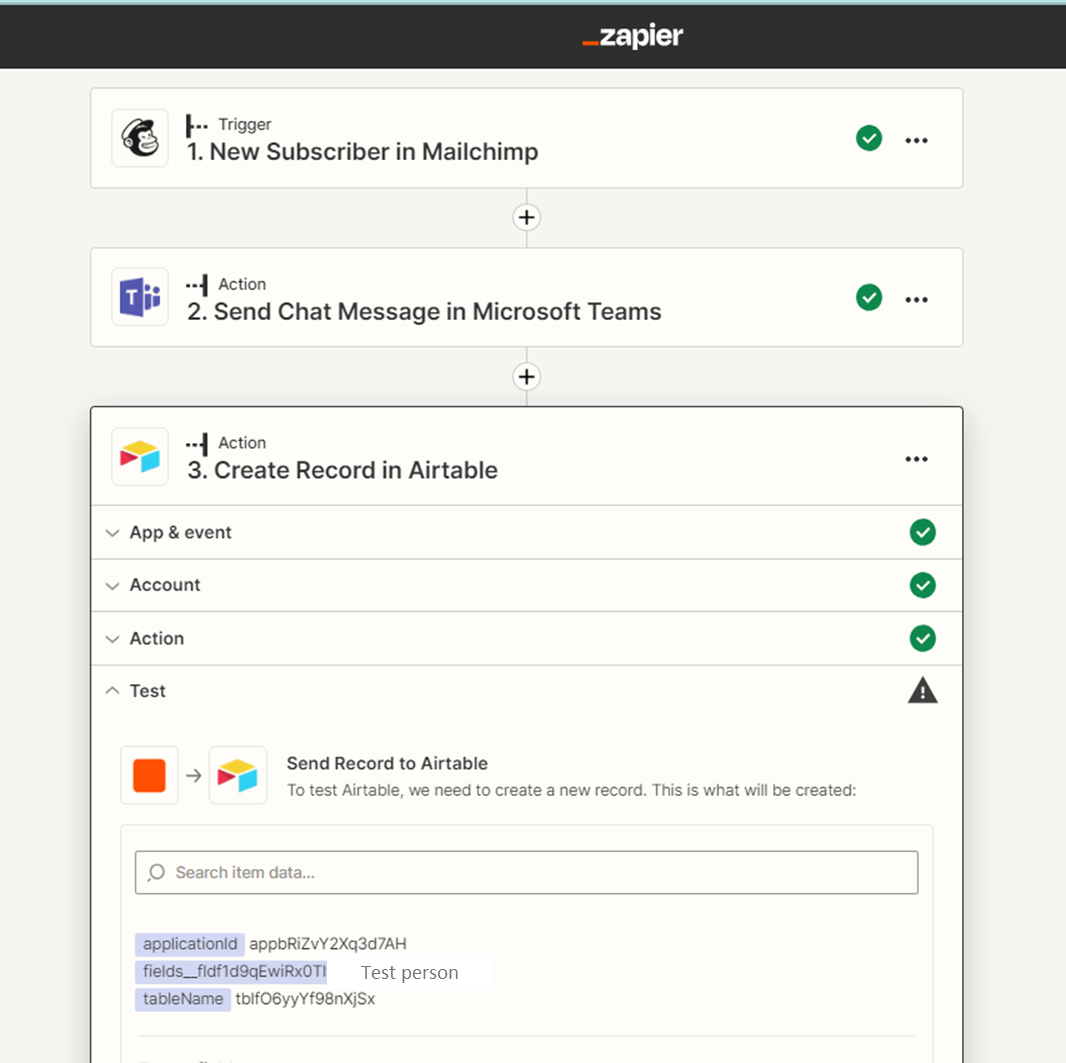
Here's an example of how we use it to link Mailchimp, Teams and our Airtable database so that when a new person signs up for our newsletter it pings us in a Teams chat to let us know, and then adds the person and all their information from our sign up form to our Airtable database.
Cost: Zapier’s free plan lets you set up 5 automated integrations for 100 actions which might be sufficient for a small charity. The drawback of the Zapier free plan is that it doesn’t allow multi-step scenarios. This means it’s really only good for the most basic of automations.
The paid version starts from around £200 a year and you can get a 15% Not for Profit discount bringing it down to around £170 a year.
Make
Slightly more complex to use, but the plus of this is greater capability. If you have a complex workflow with branching logic e.g. if A happens to your Trigger app, X is the Action. But if B happens, then Y is the Action.
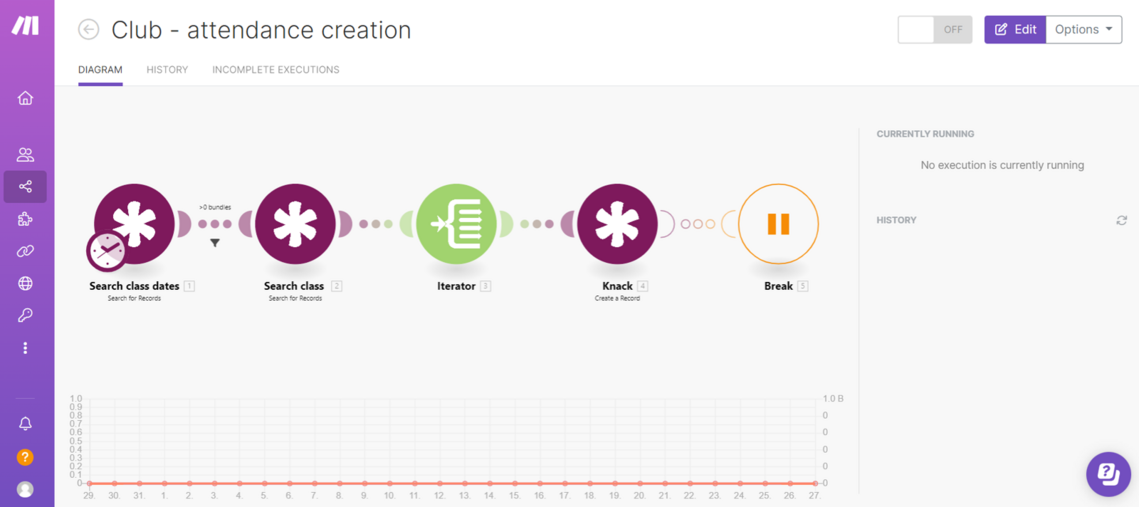
We like Make because it allows you to create multiple records in a database in a batch. In the example below for a club, the Make automation looks at a Knack database to see who is signed up for a class the night before the class is scheduled, and then it generates individualised, personalised attendence sheets for each participant.
Cost: Make lets you have two free automated integrations (which they call scenarios) with 1,000 actions. On top of that, Make also lets you create multi-step scenarios. The draw back here is that, 2 scenarios might not be enough.
The next step up from the free version is their Core licence which starts from around £100 per year. Make offer Not for Profit discounts so it’s worth contacting their sales team to find out what they can offer.
Built in automation tools
Several software platforms or packages have built in integration & automation tools. The benefit of these tools are that they are often included in something you're already using and connect to tools you might well also be using.
Microsoft Power Automate
Microsoft Power Automate is part of the Microsoft Office 365 suite and enables users to create automated data sharing & workflows between different applications and services. Microsoft use the terminology "Connectors" to describe these links.
In Power Automate Connectors serve as bridges between different systems, enabling data exchange and interaction. You can link Microsoft 365 apps (Excel, Word, Outlook, SharePoint, Teams) with each other or connect outward to some CRM systems, databases, cloud storage services, and social media platforms.
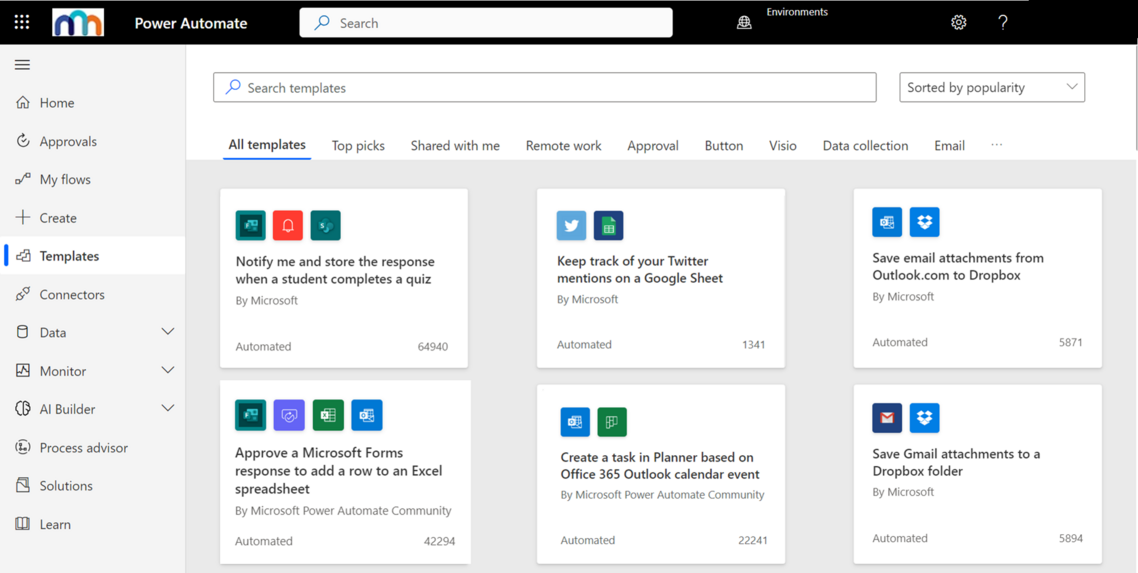
Microsoft offer a range of templates which can help get you started:
Low-code/no-code build your own database tools
Most of these build your own database packages have built in automation tools. We've seen great use case examples in Airtable, Zoho Creator and Knack.
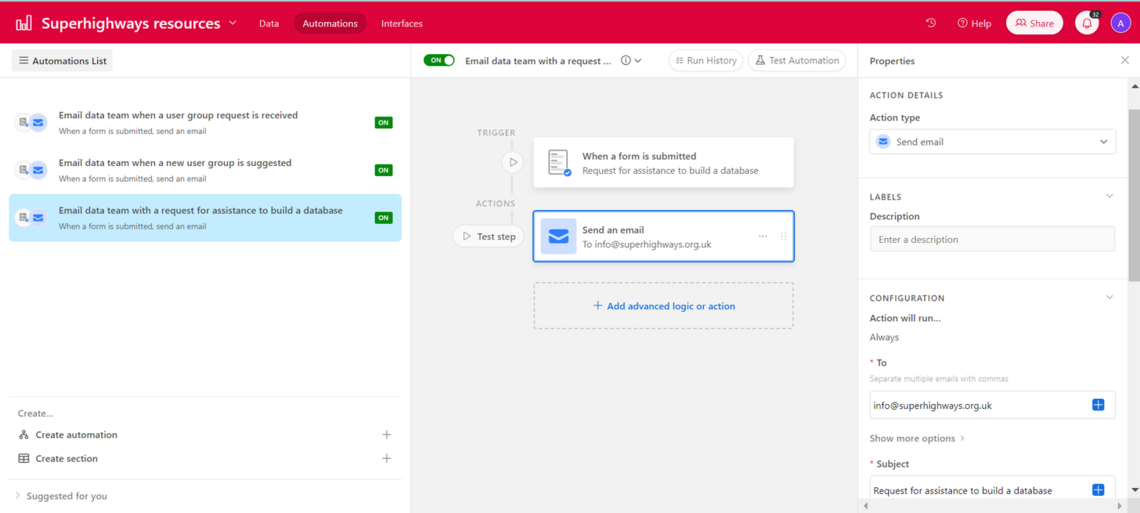
Here's a simple example from our own Airtable database, where if someone signs up using one of the Airtable forms embedded on our website, an email will automatically be sent to our email address to notify us.
If you'd like to learn more about building your own database using no-code/low-code database tools check out our resource How to build your own small charity database.
One final thing to keep in mind with all this new technology is data protection compliance and best practice. You'll need to check your data privacy policies, if you only have permission to store someone's data in a specific place for a specific purpose you'll need to ensure those rules are applied. The good thing is that these tools can help you ensure you're meeting these requirements, for example if someone unsubscribes from a newsletter, you can set it to automatically update your database to either remove them, or note that they don't want to receive any mailings, rather than having to rely on someone remembering to do this.
Published 27 June 2023
Contact

Datawise London is a partnership led by Superhighways at Kingston Voluntary Action.
If you are interested in finding out more about the project and its resources or would like to share your own data ideas and challenges please contact us.

